
Vector 调研测试之环境安装
 Hwsdien
前言
在以往的工作经历中,曾经使用过 Filebeat、LogStash、Flume-NG 等工具来进行日志的收集、转换、过滤和路由,最终将日志保存到相应的存储系统中。例如,使用过 Flume-NG 来从 Kafka 消费数据,并将其保存到 HDFS或对象存储中,以便进行大数据计算和处理。还使用过 LogStash 来从 Kafka 消费数据,然后按天分索引保存到 Elasticsearch 中,以便进行便捷的查询操作。
然而,我个人觉得 Flume-NG 和 LogStash 虽然功能强大,但也存在一些不足之处。它们相对复杂,依赖于 JVM 的运行环境,而且内存占用较高。
因此,我对 Vector 产生了兴趣。Vector 是用 Rust 语言开发的,具有内存安全性和出色的性能。我在本地环境进行了一些简单的测试,测试的假设场景类似于用 Flume-NG 将数据写入对象存储系统和用 LogStash 将数据写入 Elasticsearch 的情况。
为了保持测试的完整性,我重新安装了所有必要的组件,并记录了本地安装过程以及着重介绍一下 Vector 。我希望这些记录对其他人在类似情况下的优化和迁移决策有所帮助。
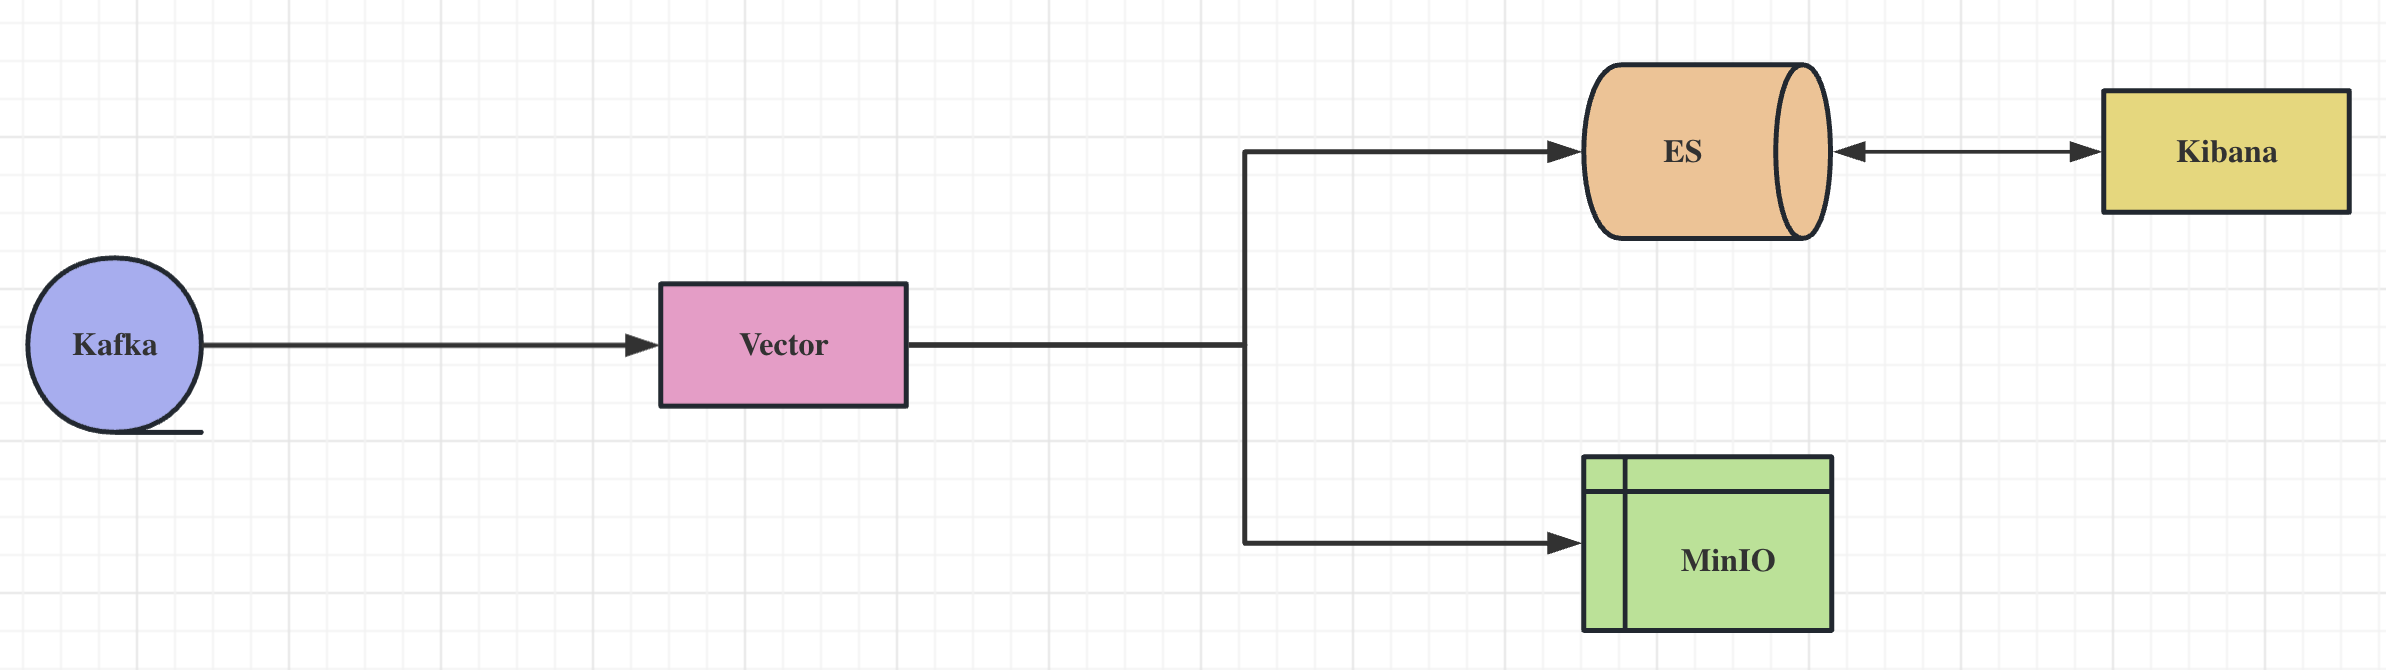
架构图
环境说明
-
操作系统
- Apple M1 Pro
- Ubuntu 22.04.3 LTS
-
Vector
vector 0.32.1 (aarch64-unknown-linux-gnu 9965884 2023-08-21 14:52:38.330227446)
-
Kafka
stable 3.5.1 (bottled)
-
ElasticSearch
7.17.4
-
Kibana
7.17.4
-
MinIO
stable RELEASE.2023-09-07T02-05-02Z
-
IP地址说明
Vector 的机器IP为:10.211.55.3
除 Vector 之外的机器IP为:192.168.31.37
10.21.55.3 与 192.168.31.37 网络互通
Vector
-
说明
本人测试的环境是 Apple M1 Pro 这台笔记本电脑,由于 Vector 暂时不支持 aarch64 的 macOS 环境,因此我用虚拟机安装了一个 Arm64 的 Ubuntu 进行测试,对应的内部IP是:10.211.55.3。
-
官方网址
-
Github 仓库网址:
-
主要优势
- 性能优异,能高效地使用内存和CPU资源,达到较高的数据吞吐量。
- 自身支持用VRL安全且高效地解析转换数据。
- 可以部署为代理器也可以部署为聚合器,架构灵活。
- 支持端到端,良好的可靠性和准确性。
-
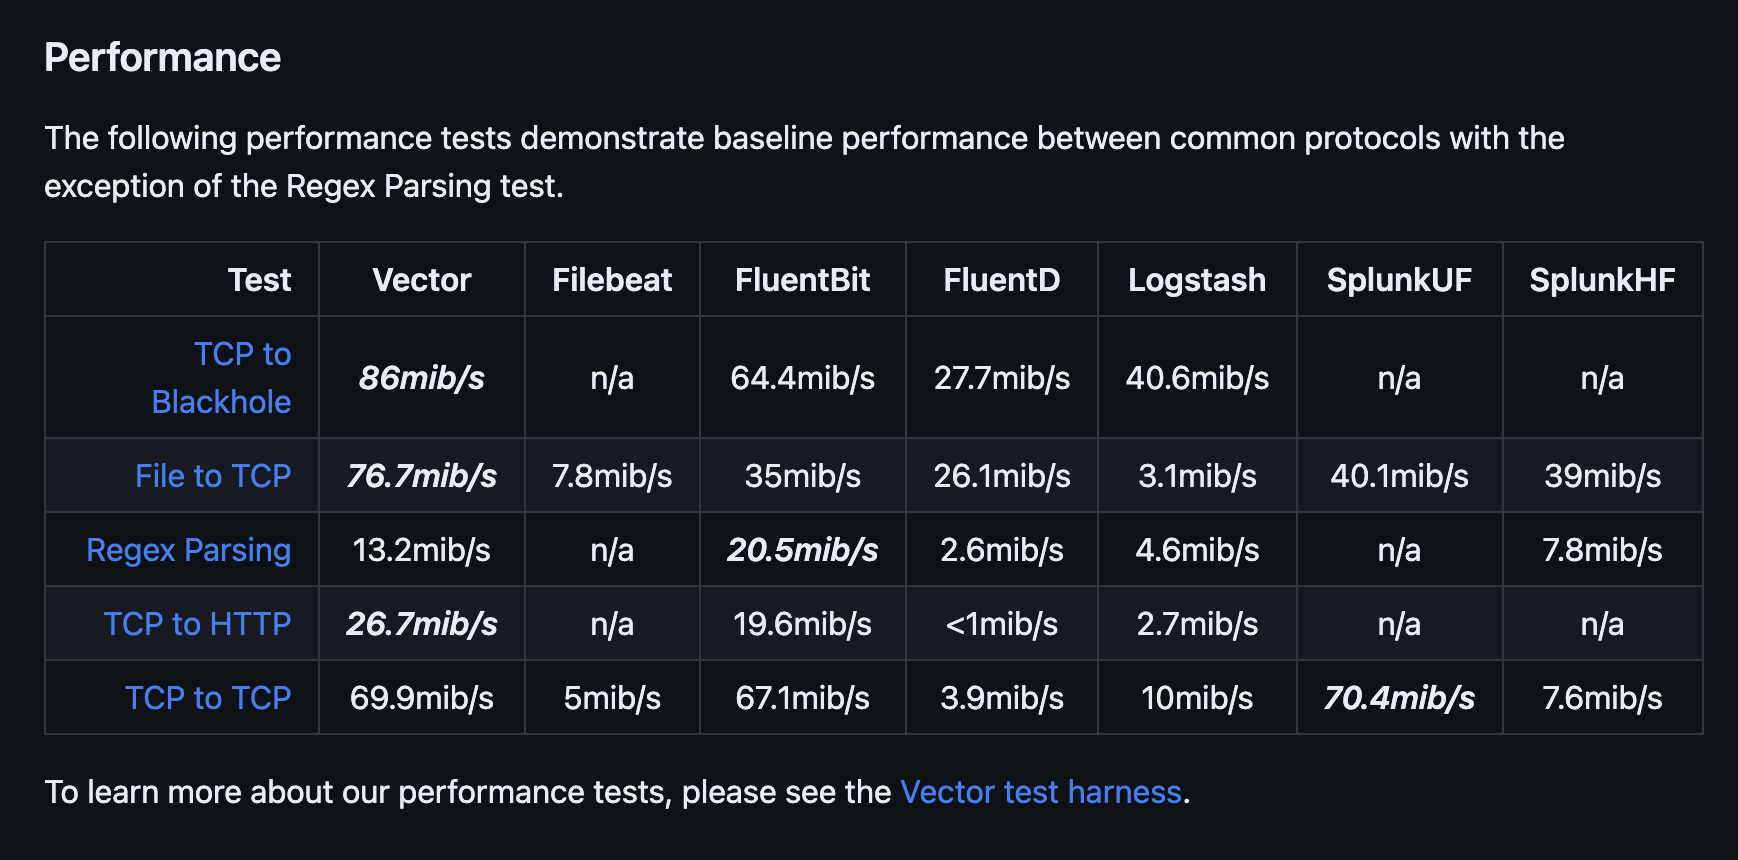
性能对比(来自 Github )
-
下载
1wget https://packages.timber.io/vector/0.32.1/vector-0.32.1-aarch64-unknown-linux-gnu.tar.gz -
解压运行
1
2
mkdir -p /opt/vector tar -zxvf /tmp/vector-0.32.1-aarch64-unknown-linux-gnu.tar.gz -C /opt/vector --strip-components 2 -
查询版本
1/opt/vector/bin/vector --version -
测试
-
编写配置文件
修改 /opt/vector/config/test.toml
1 2 3 4 5 6 7 8 9 10 11[api] enabled = true address = "0.0.0.0:8686" [sources.in] type = "stdin" [sinks.out] inputs = ["in"] type = "console" encoding.codec = "text"- 指定配置文件运行
1/opt/vector/bin/vector -c /opt/vector/config/test.toml- 查看运行是否正常
- 查看 playground
http://1.55.3:8686/playground
- top
1vector top - 查看 playground
-
Kafka
-
安装 Kafka 3.5.1
1HOMEBREW_BOTTLE_DOMAIN= brew reinstall kafka -
生成集群ID
1 2KAFKA_CLUSTER_ID="$(/opt/homebrew/opt/kafka/bin/kafka-storage random-uuid)" echo $KAFKA_CLUSTER_ID -
格式化日志目录
1/opt/homebrew/opt/kafka/bin/kafka-storage format -t $KAFKA_CLUSTER_ID -c /opt/homebrew/etc/kafka/kraft/server.properties -
修改 homebrew.kafka.service
vim /opt/homebrew/Cellar/kafka/3.5.1/homebrew.kafka.service
ExecStart=/opt/homebrew/opt/kafka/bin/kafka-server-start /opt/homebrew/etc/kafka/server.properties
修改成:
ExecStart=/opt/homebrew/opt/kafka/bin/kafka-server-start /opt/homebrew/etc/kafka/kraft/server.properties
-
修改 homebrew.mxcl.kafka.plist
vim /opt/homebrew/Cellar/kafka/3.5.1/homebrew.mxcl.kafka.plist
/opt/homebrew/etc/kafka/server.properties 修改成:
/opt/homebrew/etc/kafka/kraft/server.properties -
修改配置文件
此步很重要,不然另一台机器连接Kafka会有问题。
vim /etc/hosts
192.168.31.37 kafka-1
vim /opt/homebrew/etc/kafka/kraft/server.properties
将 localhost和需要指定Host的地方改为 kafka-1
-
后台启动运行
1brew services start kafka -
前台启动运行
1/opt/homebrew/opt/kafka/bin/kafka-server-start /opt/homebrew/etc/kafka/kraft/server.properties -
创建Topic
1kafka-topics --create --bootstrap-server kafka-1:9092 --replication-factor 1 --partitions 6 --topic first-topic -
查看创建的Topic
1kafka-topics --list --bootstrap-server kafka-1:9092 -
查看Topic的详情
1kafka-topics --describe --bootstrap-server kafka-1:9092 --topic first-topic -
生产消息
1kafka-console-producer --broker-list kafka-1:9092 --topic first-topic -
消费消息
- 不指定 group
1kafka-console-consumer --bootstrap-server kafka-1:9092 --topic first-topic --from-beginning - 指定 group
1kafka-console-consumer --bootstrap-server kafka-1:9092 --group console-consumer-nate --topic first-topic --from-beginning
- 不指定 group
-
查看 offset 的消息情况
1kafka-consumer-groups --bootstrap-server kafka-1:9092 --describe --group console-consumer-nate
ES
-
安装
1
2
3
brew tap elastic/tap brew info elasticsearch-full brew install elastic/tap/elasticsearch-full -
配置环境变量
export ES_JAVA_HOME=/opt/homebrew/opt/openjdk@11
vim /opt/homebrew/Cellar/elasticsearch-full/7.17.4/libexec/bin/elasticsearch-env 在ES_HOME下面加入:ES_JAVA_HOME=/opt/homebrew/opt/openjdk@11
-
修改配置文件
vim /opt/homebrew/Cellar/elasticsearch-full/7.17.4/libexec/config/elasticsearch.yml
1 2 3 4 5 6network.host: 0.0.0.0 http.port: 9200 discovery.seed_hosts: ["127.0.0.1"] xpack.ml.enabled: false xpack.security.enabled: false -
前台启动
1/opt/homebrew/opt/elasticsearch-full/bin/elasticsearch -
后台启动
1brew services start elasticsearch-full -
查看状态
访问:
http://127.0.0.1:9200/或者在Chrome浏览器用 Elasticvue 连接上使用
Kibana
-
安装
1
2
brew info kibana-full brew install elastic/tap/kibana-full -
启动
1
2
brew services start elastic/tap/kibana-full kibana -
使用
访问:
http://127.0.0.1:5601/app/home#/
MinIO
-
安装
1brew install minio/stable/minio -
启动
1minio server /Users/yuhongzhao/MinIO --address ":9000" --console-address ":9001" -
安装管理工具
1brew install minio/stable/mc -
配置并查看
1
2
mc alias set local http://127.0.0.1:9000 minioadmin minioadmin mc admin info local -
登录并创建Bucket
访问:http://127.0.0.1:9001/login
用户名:minioadmin
密码:minioadmin
-
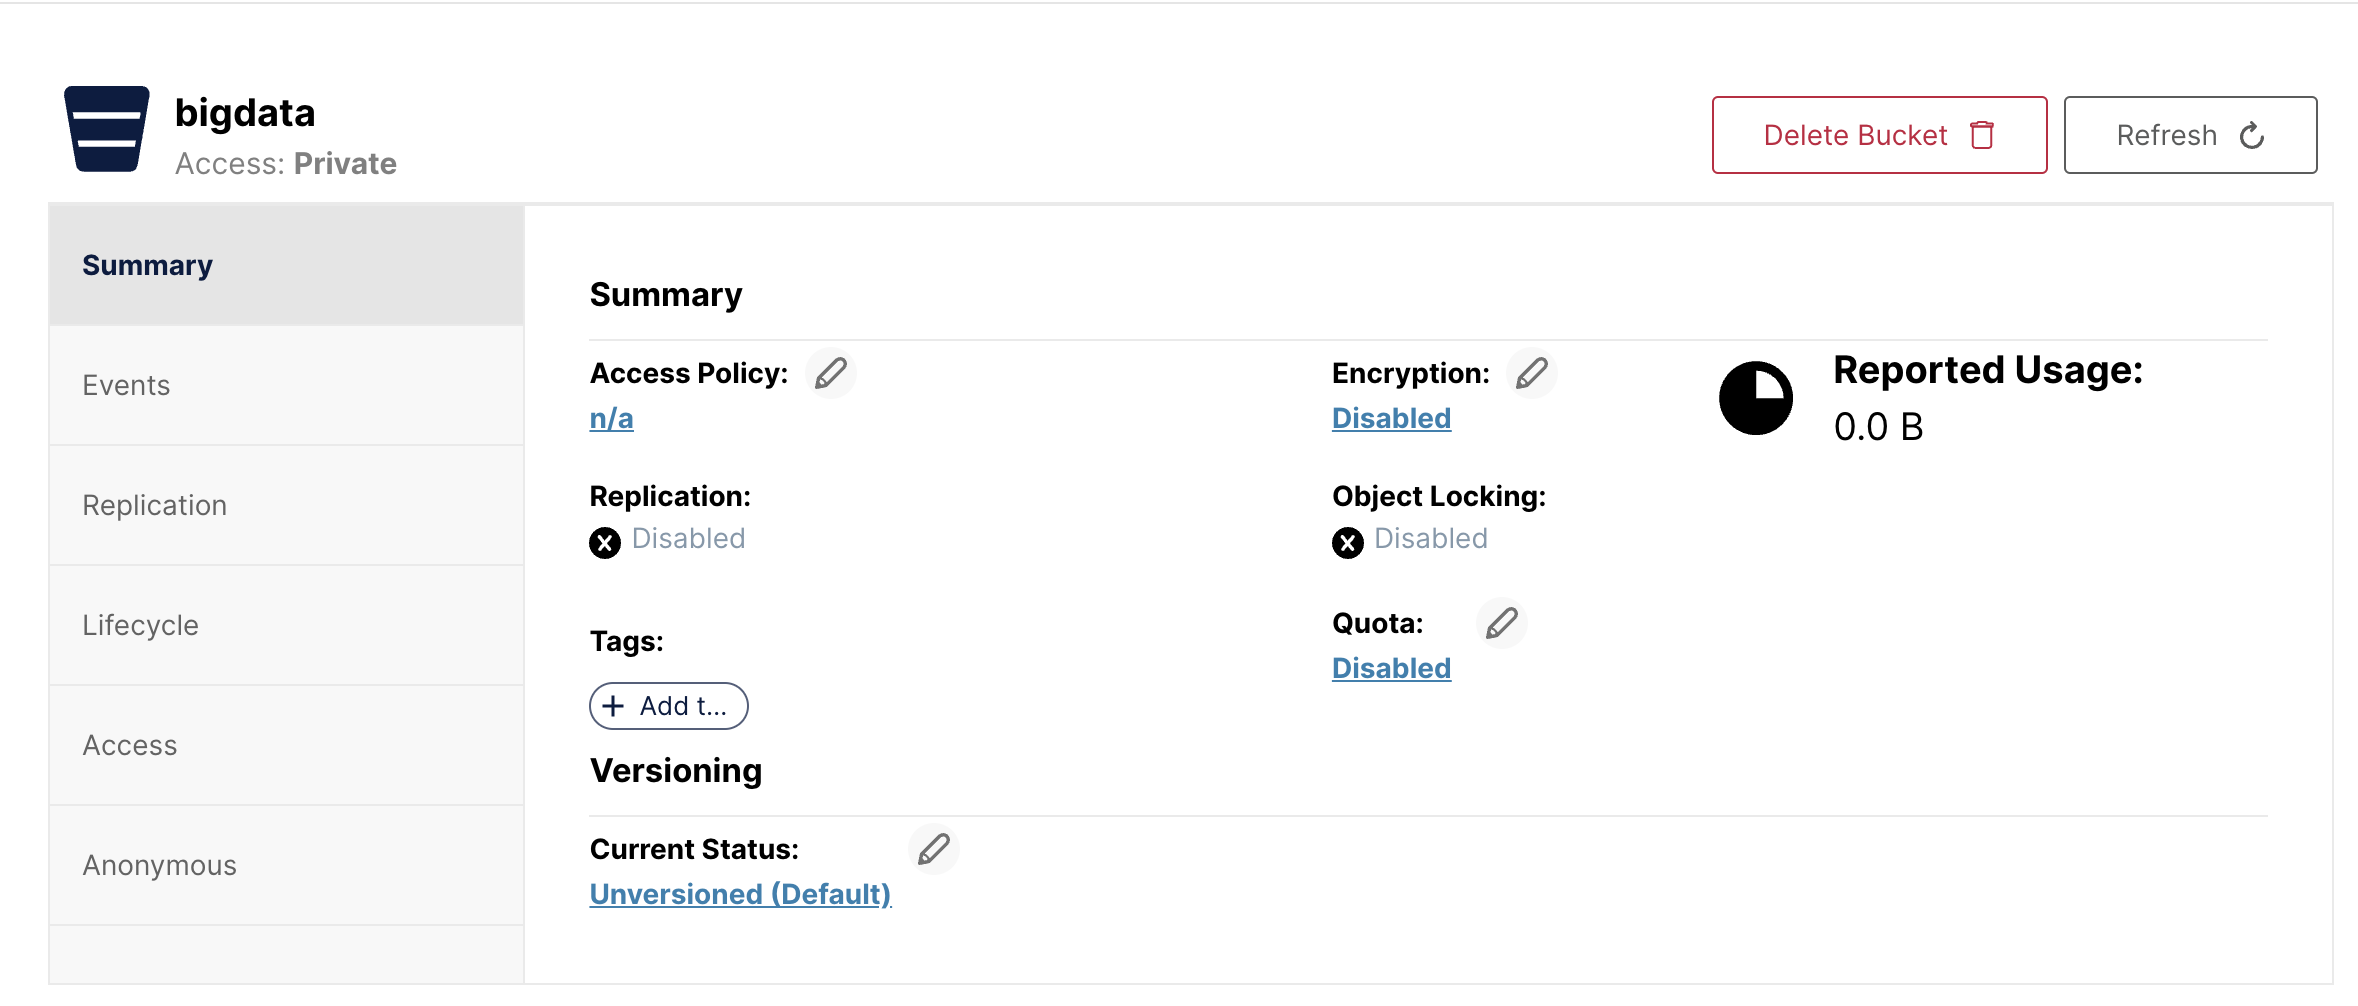
创建名为 bigdata 的 bucket
-
创建AK信息
登录到后台自行创建出来。这里创建的测试信息如下:
1
2
3
S3-API:http://127.0.0.1:9000 Access-Key:jlKIj2T8EbOxHZLIGcws Secret-Key:pnKQxp2qMAy3XMBH6zP3fCHAg59ZlLhvSBDDFqj0 -
简单测试
使用到这个库:https://github.com/minio/minio-py
|
|